Recently I was asked to review an iPhone app SetMyCamera aimed to assist photographers in several aspects of photography.
Disclaimer: The only endorsement I received was a promo code to download the application for free, so I can play with it, and I don’t get any other benefits. Therefore, this review is my honest opinion of this application.
The app comes in three versions – SetMyCam Pro, MX, and DF. The Pro version contains all the features, while other versions contain less. I will go over all the features of the Pro app and at the end of the review will tell you briefly about the other two versions.
DoF – Depth of Field calculation
First of all, what is DOF? If you are not familiar with this concept, and you are into photography, you really should get to know it. I will briefly explain it with an example. Let’s say you are photographing your local basketball team and they all are standing in front of you in three rows (one row behind another). You aim your lens at them and focus on the faces in the middle row, so this row will be in focus for sure. But what about the row of players that in front and the one at the back? Will their faces be in focus as well? If you have sufficient Depth of Field then they will be in focus, otherwise they won’t. So which factors can change your DoF? There are quite a few:
1. The f/Stop that you chose. The bigger the f/Stop number, the bigger DoF you’ll get.
2. The focal distance of your lens. Wide angle lenses have generally bigger DoF than telephoto lenses. It means that at the same f/Stop wide angle lens will get you more planes in focus than a telephoto lens.
3. Distance from your lens to the plane on which you primarily focus.
4. Sensor size of your camera.
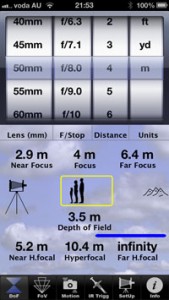
Most photographers develop an intuitive feeling for DoF from experience, but if you want to know exactly your DoF, or just better understand how it works, this tool in SetMyCam will be a good aid. Here is how it looks:
Before using any of the features in SetMyCam you’ll have to set your camera model so the app will know the size of your camera’s sensor. Then, in the DoF screen you can choose the lens that you are using, the f/stop, and the distance to your main focused object. Then the app will show you your DoF. Great educational practice would be changing various parameters and seeing how they affect the actual depth of field.
FoV – Field of View simulation
Again, first let me briefly explain what field of view is. In short, field of view, is what your camera sees. So when you use a wide angle lens your camera sees “more space”, and when you use a telephoto lens, your camera sees “less space”. However it is not as simple as that. Wide angle lens has a different perspective from a telephoto lens. If you shoot a landscape with a wide angle lens, for example, you will get more depth in your images, which means you can really tell that (for example) this tree is closer to me, than that cow in the distance. There is a better feeling of space. If you shoot the same landscape with a telephoto lens (first, you’ll have to get much farther from the point you shot it with wide angle lens, just to fit the same amount of space into your frame), you will get a “compressed” shot. It means that that cow in the distance will appear to be at the same distance as the tree, and just their sizes will be awkward. If you saw photos with a huge moon setting over a house or a hill – it was done by exploiting this fact. Photographer took a telephoto lens (lets say 1600mm) and shot this composition.
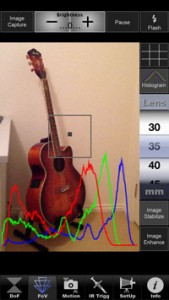
SetMyCam allows you to see on your iPhone screen what your camera will see using different lenses ranging from 30mm to 800mm (it can’t go wider than 30mm because this is the focal length of the iPhone’s camera), and it does it by utilizing digital zoom. You can also choose to display histogram.
Motion
If you are not familiar with the “camera shake” concept, let me briefly explain. You can never hold your hands perfectly still, there is always at least a slightest movement. When you shoot handheld at slow shutter speeds (1/15th of a second for example) this movement of your hands affects the image by making it blurry. So what is the slowest shutter speed that you can shoot at but still get a sharp image? The answer is – it depends. It depends on the lens that you use (focal length), on the distance to your subject, and also on the stability of your hands.
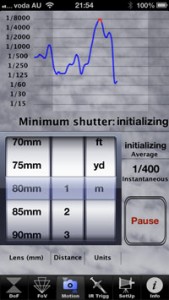
SetMyCam can calculate for you that slowest shutter speed. To do that you set your focal length and the distance to your subject (approximate distance will be just fine), and then you hold the iPhone as steady as you can. After a brief moment the app will display the minimum shutter speed that you can use and still get a sharp image.
However, you should also take into account that your camera is much heavier and ergonomically different from the iPhone, and possible use a shutter speed just a tad faster. Remember that if you use tripod, you don’t need to be worried about camera shake.
IR Trigger
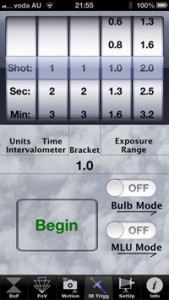
This feature of SetMyCam can be used only if you have an additional IR transmitter that plugs into your iPhone. I don’t have it, so I couldn’t play with this feature, however if you do have one and your camera supports IR triggering, this feature can be quite handy. In addition to simply remotely triggering your camera, you can do much more: you can shoot time-lapses, bracketed shots, and trigger the bulb mode.
This feature is pretty nice (provided you have the IR device for the iPhone), especially if you want to shoot timelapses, because you don’t have to buy an additional device for that and use your iPhone instead.
SetMyCam Pro has all these features and you can get it for $5.99 in Australian Apple store.
SetMyCam Mx has DoF, FoV, and Motion features (no IR trigger) and goes for $4.99
SetMyCam DF has DoF and FoV features and costs $2.99
Conclusion
This app might not be of much use in “real time” when it is time to shoot in my opinion. Because when you are shooting, for the most part you won’t have the time to get your iPhone, open the app, calculate everything that you need to calculate, then take out your camera and take a shot. However it is a great tool for self education – for example in DoF module you can play with different focal lengths and other parameters and see how exactly they influence the depth of field. Or when you know in advance the requirements of the shot and you must get everything in focus, it is a good idea to calculate the exact DoF.
Same with the Motion module – you can get a pretty good idea when your images will start getting blurry due to camera shake by changing focal lengths and seeing how stable you can hold your iPhone, so when the time comes you’ll have the knowledge to set your camera correctly.
FoV module: Personally I don’t find this feature to be very useful, however if, for example you go scouting locations for your next shoot, and you don’t bring your whole camera bag with all the lenses, using this feature can give you a feel of kind of photos you will get with your DSLR. Having said that, most of the photographers I know, do know their gear and don’t have to look through the viewfinder to know how the shot will look like using various focal lengths.

