Sigma 28mm f1.8 Short Review

Until only very recently I thought I would never use a prime lens on a daily basis. I have great zooms (Canon 24-70 f2.8 L, Canon 70-200 f4 L, Canon 10-22 f3.5-4.5), which are sharp enough for me, and their overall quality is superb. So I saw no need for a more “restricting” piece of glass. But after laying my hands on a prime lens I realized that I was wrong.

The full description of the lens I got is Sigma 28mm F1.8 EX DG Aspherical Macro. Since I have a cropped sensor, 28mm on it is almost like 50mm on a full frame sensor.

This is not a gazillion pages technical review (for that go to dpreview.com, though I’m not sure they reviewed this one), but more of my impressions from this lens, its good and bad sides, and my additional prime-lens-related thoughts.

Lets start with why I think prime lens is a great addition to anyone’s lens collection. When I don’t have any specific photographic ideas in mind, I grab only this lens with me and go out for a walk. It is like shooting with an iPhone in a sense that you don’t have to switch lenses, or to zoom in/out to find an optimal composition. All you got is your 28mm (50 on cropped sensor). One may think that it is very limiting, but I found that it took out the “worrying” aspect, and freed my mind. I was free to think about the creative aspects of photography, and didn’t have to think about which lens to choose. If I need to zoom in, I do it by getting closer to the subject. You get the idea.

Now, about this lens in particular: f1.8 has a very shallow depth of field, which is wonderful if used consciously. Combined with amazing macro abilities of this lens it enabled me to get pretty nice shots. The two shots below were made using f1.8 and I also found them to be really sharp. I found some reviews of this lens saying that though it is very sharp, it gets softer at small f-numbers, but I didn’t notice that. Maybe I’m not that picky.

Click on the photo to enlarge.

Note the nice bokeh in the b&w photo. Next photo is of ants on tree stump. It was also taken at f1.8 and shows nicely the shallow depth of field at this aperture.

Click on the photo to enlarge.

I’ve already mentioned the amazing macro of this lens – even though in the manual it says minimum focusing distance is 20cm (7.87 inch), I found that this lens just keeps on focusing no matter how close I am to the subject. I can’t say exactly what is the minimum distance, but it feels like you can bring the lens very close to your subject and still focus.

Click on the photo to enlarge.

This lens is also great for general purpose photography. It is sharp, it focuses pretty fast, and it renders the colors very good.

Click on the photo to enlarge.

I also got to shoot a few landscapes with it, and was really satisfied with the results.

Click on the photo to enlarge.

Having said about the good qualities of this Sigma prime lens, there are a few issues that have to be mentioned.

This lens doesn’t have an ultrasonic motor which means that the focusing is pretty loud. Another thing to consider is when you want to switch from auto focus to manual (and back), you have to do it in two steps – there is a switch from AF to MF just like in canon lenses, and then you have to slide the focus ring a few millimeters. The thing is that when you are in manual focus mode and the focus ring is in the correct position, you will have to turn it to focus (hence the name 🙂 ), but when you switch to auto focus mode and leave the focus ring in the same position, it will turn automatically when the lens will try to focus, and you won’t be able to hold the lens comfortably. So you have to slide the focus ring a few millimeters and it stops moving.

There is one more thing which is a little less obvious, but I’ve noticed that this lens is more sensitive to flare than my Canon lenses. In several cases with front lighting my Canon lenses didn’t have flare but this lens had.

In conclusion I am very satisfied with this lens. I like the quality and the sharpness of the photos it produces. The only thing that bugs me a little is the noisy focus motor.

Disclaimer:

Everything written here is my opinion and my experience. All the photos in this article were taken with this lens (Sigma 28mm F1.8 EX DG Aspherical Macro) but they were also post processed in Lightroom. Post processing included subtle adjustments such as curves, clarity, and vibrance.  All photos were shot in RAW format, b&w photos were converted from color (all RAW photos are in color) to b&w.

Your opinion matters! The comments section below is for you to share your experiences, and ask questions.

Till the next time, take care!

Greg.

Using UV Filters For Protection – Right or Wrong?

For those of you who don’t know what the hell I am talking about, I’ll briefly explain the issue.

When you buy an expensive lens, you want to protect it’s front glass element from scratches or other accidents. So most likely the photo dealer will suggest you to buy a UV (ultraviolet) protection filter to screw on your lens. But the question is – will shooting with UV filter degrade the image quality?

Lately I found myself bothered with this question a lot. It started when I bought my Canon 24-70mm f2.8 L lens. I bought it second hand, and the guy who I bought if from told me that it was with the UV filter all the time since the day he bought it, so it is completely scratches free. Way back I took an advanced course in optics in university, and I know that adding additional optical element to optical system changes system’s overall performance. This is exactly what you are doing to your optical system, i.e. your lens, by adding additional optical element, i.e. UV filter.

So how significant this “change in performance” is? In other words will the final image suffer in quality because of that?

I felt incompetent to perform tests to find an answer myself so I did an extensive web research, and I found a lot of information on this subject. It seems that there is no single conclusion to this matter, but here is my summary on it, which in my opinion includes all the major points, fact,s and conclusions regarding using UV filter on your lens for protection.

  • Putting UV filter on your lens will certainly degrade lens’s performance.
    • Explanation to this is pretty simple. When you screw on the UV filter on your lens, you basically add one more optic component, but not only that you also add a space filled with air between the filter and lens’s front optic element. So when ray of light hits your lens, instead of hitting the lens’s front element and passing to other optical elements inside the lens, it first hits the UV filter, refracts, passes to the space filled with air between the UV filter and the lens, and only then enters the lens. That ray of light can also be reflected several times between the lens and the UV filter (coating on the UV filters tries to prevent that).
  • The extent of the image quality degradation may vary from invisible to the human eye to a severe degradation in contrast and sharpness (and other image qualities), and it depends on the following factors:
    • The quality of the UV filter
      • I found many photographers complaining about Tiffen UV filters (even about the expensive ones). I even saw a test one guy did showing that using a Tiffen UV filter significantly decreases sharpness and contrast. That guy didn’t write the exact model of that filter though.
      • There is general agreement among photographers that expensive UV filters with double coating are the best choice if you must put a UV filter on your lens. Many photographers recommend the high end UV filters from B&W, Nikon, Hoya (Super HMC), Singh-Ray.
    • The subject that you are shooting – or more important the direction of light. For example if you are shooting into the light, then with UV filter there are more chances to have lens flare (partial solution is to use lens hood).
    • The lens. If the lens that you use is not of high quality, it may already produce less than great images, and adding a UV filter won’t make them worse than they already are.
  • There is everlasting debate whether one really needs the UV filter to protect the lens. Here are some pros and cons:
    • Pros:
      • UV filter gets dirty instead of the lens, so you don’t have to clean the lens that often (just clean the UV filter), thus protecting the lens’s coating.
      • When shooting on the beach, or during sand storms, or in any conditions where there are tiny particles in the air, which eventually land on your lens, you are risking scratching your lens when cleaning. Better scratch the UV filter.
        • Lens cleaning tip – when there are tiny particles on your lens don’t wipe them off because that can scratch the lens. Wash the front element first and then wipe it with micro fiber cloth.
      • If you accidentally drop your lens, or bump it into something, the UV filter will take the blow saving the lens.
        • Actually another opinion is that in such situations if UV filter breaks then its glass might easily scratch the lens.
      • The degradation of image quality resulted from UV filter is negligible in most cases.
    • Cons:
      • This one is somewhat philosophic – why put a 100 dollars piece of glass on a $1500 expensive lens? It means that it is very difficult to produce a high quality lens, and this is why it is so expensive, and by putting a relatively cheap (to the lens’s price) UV filter, you must degrade it’s quality.
      • Lens hood does great job protecting the lens so no UV filter is needed in most situations.
      • Don’t over protect your equipment risking loosing in image quality. Be reasonable, and predict when your lens might be in danger and when not.
      • The hard coating on most expensive lenses is very strong and can withstand numerous washes and cleanings (as long as you do it wisely).
      • Buy Lens Warranty instead of UV filter 🙂

Here is a great test of UV filters in action by Ken & Christine

In conclusion, there is no simple right or wrong here. Having all the information above you must decide for yourself whether to use UV filters or not. I decided to use them when shooting on the streets or in dusty conditions, but to remove them when shooting portraits, studio, or landscapes, in other words when there is little risk to damage the lens. I also use lens hoods almost all the time. If I was a millionaire and money wasn’t an issue 🙂 , I probably wouldn’t use the UV filters at all just to be sure that I am getting the maximum quality that my lens can deliver.

If you have additional information regarding this issue, you are welcome to share it here, and

Remember, you only have to enter your name to leave a comment!

Have a great day,

Greg.

Compurover from Lowepro Review

As I promised in the article about my trip to Switzerland, I am writing a detailed review on a photo backpack, which I took with me on that trip. It is a “Compurover” from Lowepro. When I was looking for a photo backpack on the net, I had trouble to find good reviews made by people who were actually using the product rather than just going over its features. I also had trouble finding detailed photographs of products. On the manufacturer’s sites there is usually only one or two photos of each product, which is absolutely wasn’t enough for me to get an idea about them.

So I had to actually go to various shops and check out different backpacks and spend quite a lot of time on it. Now, after finding the product that was the closest match to my demands, and using it for a while I decided to write a detailed review of this photo backpack including my own insights and conclusions based on real experience and heavy duty use.

I will start with what were my demands from a photo backpack.

We both – me and my life partner Ira like to hike. We love nature and try to spend as much time as we can outdoors. And obviously I love photography so taking my photo gear with me is never a question. The only question is what gear I am going to take with me and how I will be carrying it. Along these lines my demands from a photo backpack were the following:

1. It has to have enough padded space for all the photo gear I am taking with me outdoors.

2. It has to have an additional compartment for other hiking related gear (clothes, food, etc.).

3. It has to have a good carrying system, to sit comfortably on my back and waist, and wisely distribute the weight across my body.

4. It has to have a tripod holder.

5. It has to have a place for hydration system.

6. It has to have small, and preferably external pockets for all the little things (filters, cleaning cloth etc.).

7. It has to have a rain cover (very important).

Pretty big list huh? I worked hard to find a bag to fulfill all this, and I can’t say that I found a perfect backpack, but I came close.

The biggest problem that I encountered was that most of the professional photo backpacks don’t have enough room for other than photo gear. So I found many great backpacks, with good carrying system, but with no place for other stuff. It still puzzles me – if photographer goes out on a long day of shooting, with tons of gear, doesn’t he need to carry also some personal stuff? I need.

And now to the actual review.

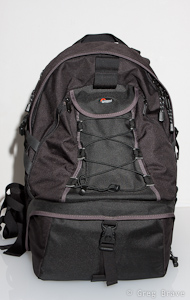
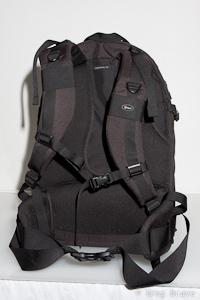
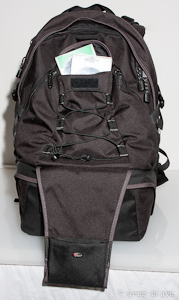
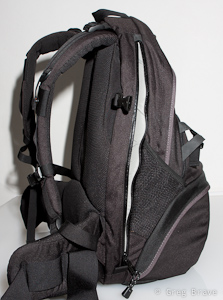
In the two photos below you can see the “Compurover” front and back. It is pretty big backpack, made from top quality materials. It has a comfortable (at least for me) carrying system. During my trip I was walking for about 10 hours (!) a day with it on my back and feeling very comfortable. The waist belt is great – it is wide and well padded, so are shoulder straps. You can also remove the waist belt for drying/cleaning purposes.

Lowepro Compurover Lowepro Compurover

Photographs by Greg Brave. Click on the photo to enlarge.

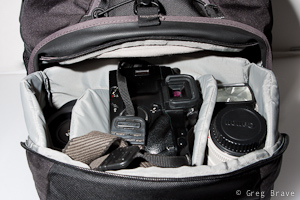
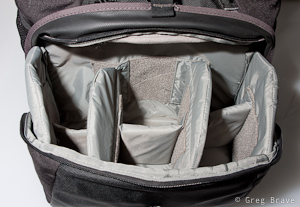
The bottom compartment is for photo gear. It is padded like any other photo bag, and you can also change its configuration to match your photo equipment. It was big enough for me. In this compartment I could carry the following equipment:

Body: Canon 40D

Lenses: Canon 24-70mm f2.8L, Canon 70-200mm f4L, Canon 100mm macro f2.8L, Canon EF-S 10-22mm f3.5-4.6

Flash: Canon 430EX

And there was still room left for one additional small lens such as Canon 28-105 f3.5-4.5

This compartment closes with a zipper and a security lock. When you open it, it slides out in an angle giving you a comfortable access to the equipment. One thing to notice – zipper is somewhat hard to zip/unzip at the corners.

Lowepro Compurover

Lowepro Compurover Lowepro Compurover

Photographs by Greg Brave. Click on the photo to enlarge.

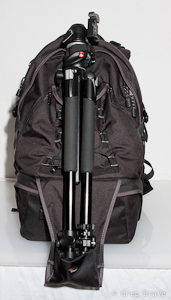
The tripod holder. When not in use it is folded upward (you can see it on the front view of the backpack above). When needed you unfold it downwards, and put a tripod in it as shown below. Lowepro’s original idea was that you put your tripod under the bungee mesh and use two additional bungee cords (which come with the bag) to secure the tripod at the top and bottom. I found that to be too inconvenient, so what I did was to remove the two bungee cords from top and bottom ( you can’t see them on any of my photos) and only on the top I put a Velcro strap. I put the tripod in the tripod holder without putting it under the bungee mesh, and secure it on the top with a Velcro strap. For me it was enough to securely carry my large tripod.

By the way if you have a small tripod, you can carry it on the side of the backpack putting its legs in the side mesh pocket and securing it with the side strap.

There is also a pretty spacious pocket, which I use to carry my polarizers as you can see on the photo below.

The downside to this tripod holder is that in order to access your photo gear you have to remove the tripod first.

Lowepro Compurover Lowepro Compurover

Photographs by Greg Brave. Click on the photo to enlarge.

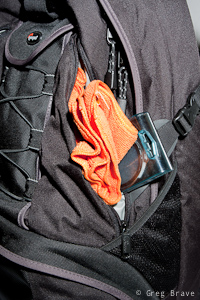
Additional pockets. “Compurover” has two small zipped pockets on the front, which I use to carry cleaning stuff, micro leatherman, and filters. Pretty convenient. It also has mesh pockets on both sides.

Laptop compartment. The access to the laptop compartment is from the side, so that you won’t have to take out all your gear before getting to the laptop, which is especially convenient when you are passing airport security. But as you probably noticed, in my demands there was no need to carry a laptop. Actually the last thing I want with me on the outdoor hike is an additional 2-3 kilos of dead weight. Do you?

But here is my big breakthrough! I found this compartment to be very useful. Almost indispensable. I use it for my 3 liter hydration system! I put it inside, close the zipper almost all the way up and pull the hose from the top to the shoulder strap.

Lowepro Compurover Lowepro Compurover

Photographs by Greg Brave. Click on the photo to enlarge.

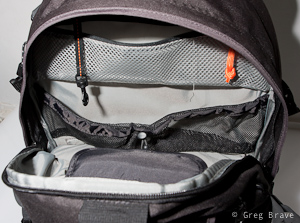
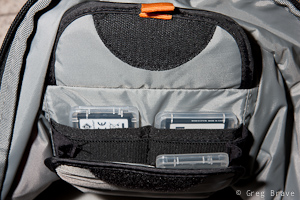
Top compartment for other stuff. You can see it on the left photo below. Actually it is pretty spacious. Unfortunately I didn’t show it in this photo. I could put quite a lot of stuff in this compartment such as rain coat, sandwiches, utility knife, and more. As you can see, inside the top compartment there is a zipped pocket and another divider. There is also a memory card holder there. You can see it in more detail in the photo on the right.

Lowepro Compurover Lowepro Compurover

Photographs by Greg Brave. Click on the photo to enlarge.

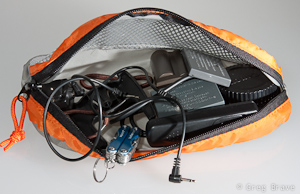
In addition, with the bag comes this small pouch, which I found very convenient to carry spare batteries, cables and stuff.

Lowepro Compurover

Photograph by Greg Brave. Click on the photo to enlarge.

The one thing that I didn’t show in the photographs is the rain cover. It has its own pocket at the bottom of the bag.

Additional important little thing is that on the shoulder straps there are two plastic rings (one on each side). If I want to hike with my hands free (for trekking poles for example), but I also want my camera to be ready any minute, I hang it on these two plastic rings instead of hanging it on my neck. And when your camera is as heavy as mine it is very important.

Summary

Pros

Lowepro’s “Compurover” is a good hiking photo backpack with good carrying system (wide and padded shoulder straps and waist belt). It has enough room for my photo equipment and it also has spacious compartment for other stuff. It has a tripod holder, and I can also carry about 2.5 liters of water in my hydration system in laptop compartment. This is especially good because I have all the top compartment for additional stuff. This backpack also has a sufficient amount of little pockets, and it has a rain cover.

Cons

The photo-gear compartment is a little difficult to open because zipper gets stuck a little bit on the corners. There is no quick access to the camera as I saw in other backpacks, so in order to get it out you will have to put down the backpack and open the photo-gear compartment. It is a big backpack, so if you want to go for a stroll in the park taking only your camera with one lens on it, this would be an overkill. If you carry a tripod then you would have to take it off the bag before being able to access your photo gear.

Conclusion

I am happy with this backpack, and most of the cons are not an issue for me. The only thing for me that is left to see is whether this backpack will hold through the years.

Comments are welcome as always, and if you find this review useful I would also like to hear about it.

Till the next time,

Take care!

Greg.

Wireless Flash Triggers

Starting to work with lighting the first thing you hear is that you have to work with off camera flashes. So you get a flash sync cord. But then you want to have two, three, or more flashes in your setup and encounter the problem triggering them all at once.

Then you find out about the wireless flash triggers and start looking into that. The first wireless trigger you find is the “Pocket Wizard” which is the most popular but costs a fortune, and you say to yourself – “I can’t afford this luxury of wireless triggering my flashes”.

And finally you find this post, where I write about my cheap wireless triggers 🙂

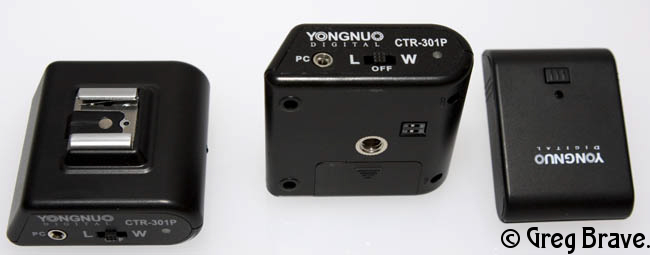
I found a cheap solution for wireless triggering my flashes. Same company (Yongnuo) that manufactures the flashes I wrote about, also makes wireless triggers for flash devices. They are cheap and have a 30 meters working range.

You will have to buy one transmitter, which goes on camera, and as many receivers as the number of flash units that you have. For example a bundle of one transmitter and two receivers on Ebay costs about $52.

Yongnuo Flash Trigger

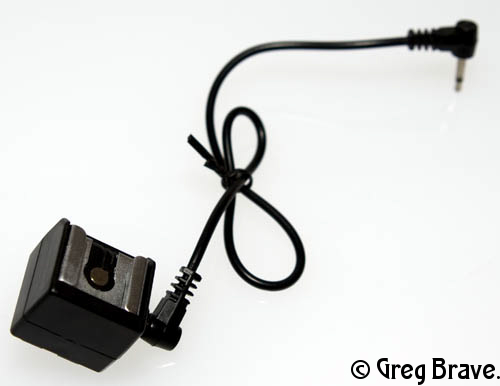
Their single disadvantage for me was that the receiver has only the regular tripod mount (as you can see in the picture), but I needed it to have the hot shoe mount. In order to solve this problem I bought flash sync hot shoe adapters ($12) for each receiver (see the photo below). However there are similar wireless flash triggers (also Chinese and cheap) that come with hot shoe mount.

flash sync hot shoe adapter

I mount the flash on the flash sync hot shoe adapter and connect it to the receiver with PC cord.

Additional advantage of these wireless flash triggers is that they can trigger the flash in two ways:

1. From the transmitter that you put on your camera.
2. From any other flash that fires in their line of sight.

Disadvantages of these wireless flash triggers may be in the build quality. I am working with them only couple of months (and they worked good until now), and I have no idea for how long they will function properly. Compared to pocked wizards their working range is pretty short but personally I never encountered (or could think of) a situation where 30 meters weren’t enough for me.

In conclusion I think that these triggers are perfect for beginners, and who knows, maybe I won’t ever consider upgrading to anything else.

My Lighting Equipment

After I wrote several posts about lighting (Light Study I, Light Study II, Patterns and Light Study), I received several responses from my readers saying – “You have up to three flash units in your setup! That is expensive. Not many amateurs who would like to experiment with lighting can afford that.”

Well, this is not exactly true. I agree that Canon flashes are expensive (even second hand), for example I bought my primary Canon 430 EX flash second hand for about 240 USD, and Nikon flashes are in the same price range. There are additional known brands that are a little cheaper but still expensive.

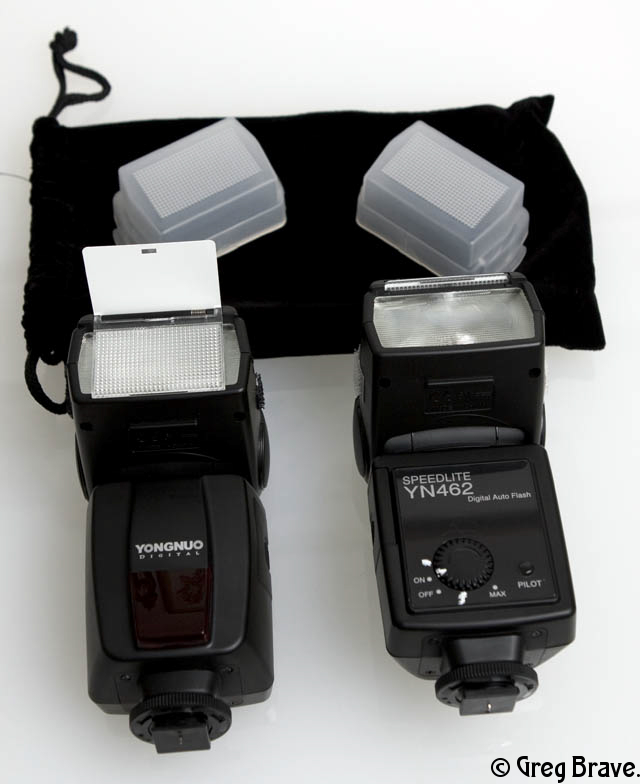
But I found really cheap flashes on e-bay from Chinese company named Yongnuo. Two of them cost me on e-bay only about 95 bucks (for both). Now you have to agree that this is cheap and much more affordable than branded flashes.

Of course there are pros and cons to such a purchase. Let me list here some of them:

Pros:

  • Price. Very affordable flash units.
  • Flash comes with diffuser dome, built-in bounce card, and wide angle cover (see on the photo below)
  • Flash head can be rotated in all the common directions almost the same as Canon/Nikon flashes.
  • The output power of the flash can be controlled (but look at the “Cons” section also)
  • GN number – 33, which means that this flash is pretty powerful.

Cons:

  • Recycling time of 5 seconds. My Canon 430EX recycles at about 2.5 seconds with Ni-Mh batteries.
  • No ETTL controls (so that flash power has to be set manually)
  • No flash zoom adjustments.
  • Power is controlled by turning wheel (see the photo below) and not digitally, so I can’t set, for example, exactly 1/2 power. I can do it only approximately.
  • No PC sync connector (but actually my Canon 430EX doesn’t have it either).
  • I am also not sure about the build quality. What I mean is that externally this flash looks good, but I don’t know how long it will work. Until now I have been using it for two months and didn’t have any problems.

Looking at the pros and cons, I can say that some of the cons are not that important to me – for example the fact that there is no ETTL controls doesn’t bother me because I always work manually with these flashes. I use them primarily as off camera flashes with remote trigger. If I have to use flash on-camera, I use my Canon 430EX. No flash zoom adjustments are also not that important – if you put your flash behind an umbrella or put a gobo on it – the zoom doesn’t really matter. Even without all this, you can just vary the placement distance of the flash.

I would like to warn you again – I can’t guarantee that the build quality of these flashes is the same as the branded ones. It probably is not. But in my opinion for beginners they can be a perfect start.

In conclusion – if you have the money buy the good and proved branded models, but if your budget is limited like mine and you still want to learn how to work with light, these Yongnuo flashes are good solution for starters.

Yongnuo Flashes
The white marks that you see near the power wheel are made by me.

In my next post on lighting I will talk about my remote flash triggers. So everyone interested – stay tuned!


If you got interested in these flashes you can visit the e-bay store where I found them. This is not an advertisement, I am not affiliated in any way with that store and don’t receive any benefits if you buy there.

Yongnuo Flashes